The brief
For a recent project we were asked to create a WordPress website which implemented some form of mega menu functionality. Menu items could have a drop down menu with one or more columns and a drop down had to have the ability to have an image of a video with a button underneath it, both of which would link through to a page with the video on it.

As is always the case with WordPress, you begin by looking for a plugin which will do this for you and as usual there was no plugin I could find which would match exactly what I wanted to do. WordPress plugins are great for taking you 70% of the way and if your client is happy with that then great, but if not then I find it is usually up to you to find a solution. That solution was the WordPress 'walker' class.
Creating a custom post type
In order to have the video image and button appear in the menu, I first needed to create some form of menu widget. I created a custom post type of 'menuwidget' in the wordpress functions.php file as follows
function os_menuwidget_post_type() {
	$labels = array(
		'name' => __( 'Menu Widgets' ),
		'singular_name' => __( 'Menu Widget' ),
		'add_new' => __( 'New Menu Widget' ),
		'add_new_item' => __( 'Add New Menu Widget' ),
		'edit_item' => __( 'Edit Menu Widget' ),
		'new_item' => __( 'New Menu Widget' ),
		'view_item' => __( 'View Menu Widget' ),
		'search_items' => __( 'Search Menu Widgets' ),
		'not_found' =>  __( 'No Menu Widgets Found' ),
		'not_found_in_trash' => __( 'No Menu Widgets found in Trash' ),
		);
	$args = array(
		'labels' => $labels,
		'has_archive' => true,
		'public' => true,
		'hierarchical' => false,
		'supports' => array(
			'title',
			),
		'exclude_from_search' => true,
		);
	register_post_type( 'Menu Widget', $args );
}
add_action( 'init', 'os_menuwidget_post_type' );
The code above will create a new option in the sidebar of WordPress admin which will allow you to create a new post of type 'menuwidget' (as apposed to a post type of type 'page' or 'post' that comes built in WordPress).

Adding the necessary fields to menu widgets
Now we have the custom post type set up, we need to configure it so that we have a field set up for all the pieces of information we have to gather. The information we want to store for each widget is...
- Name of the widget
- Thumbnail image of the video
- Title of the video
- URL to the page the video will link to
- Text to appear on the button
In order to store this information I decided to use the 'Custom Field Suite' plugin for WordPress although you could just as easily use 'Advanced Custom Fields' if you prefer.
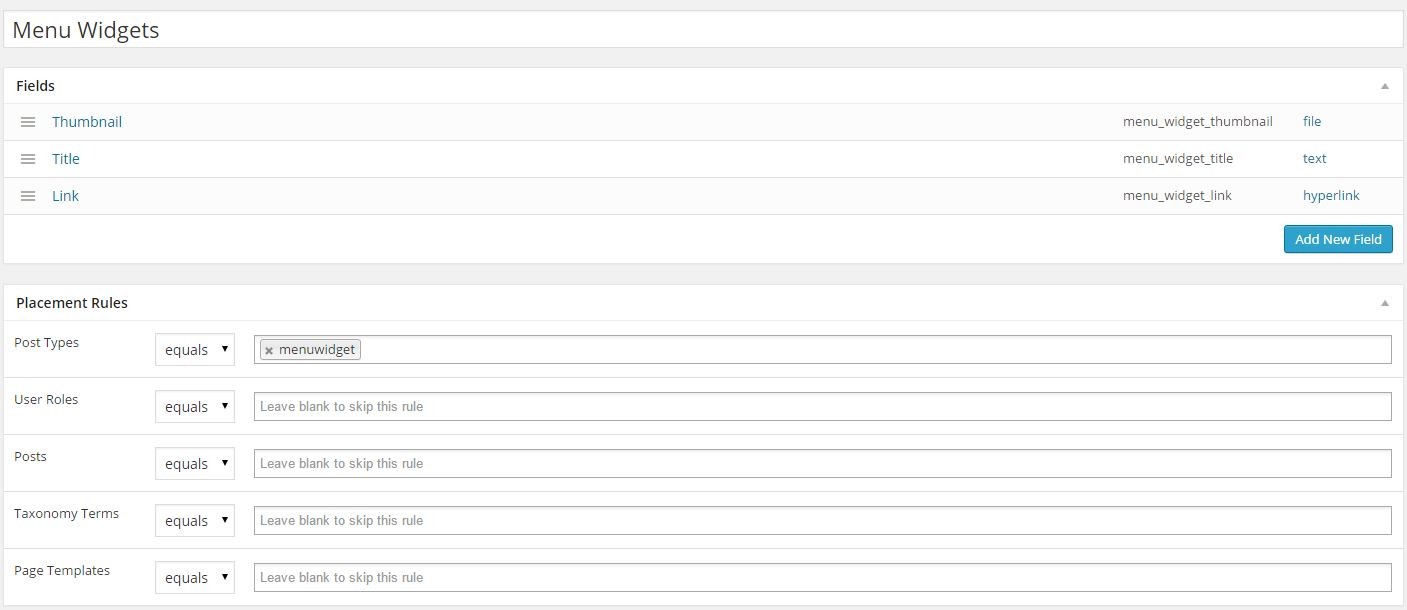
Once you install this plugin and activate it you get a new menu item in WordPress admin called 'Field Groups'. From here I created a new field group called 'Menu Widget' with the following fields...
- Thumbnail - a file upload to store the image used for the video thumbnail
- Title - The title of the video
- Link - To store the URL to the page we want to link to, along with the link text for the text that will appear on the button
The name of the widget will be stored in the post title. All I had to do then was to set the field group to apply to the post type of 'menuwidget'.

Once that is set up, I can now create as many menu widgets as I like but there is currently no way to display this widget in the menu.
Displaying menu widgets in the mega menus
Now we have our menu widgets set up, we need a way of actually displaying them inside our menus where we need them. Step in the WordPress 'walker' class.
The walker class is an abstract class designed to help traverse and display elements which have a hierarchical (or tree like) structure. It doesn't actually 'do' (in the sense of generating HTML) anything. It simply traces each branch of your tree. It is then up to the developer to extend the class to tell it what to do for each element it comes across. For our purpose, the key methods within this class are the 'start_el' method and the 'end_el' method. Make a note of whatever you decide to call your class as this will be required when you come to display your menu in your template. In the example below, this is 'my_walker'.
class my_walker extends Walker_Nav_Menu {
	public function start_el( &$output, $item, $depth = 0, $args = array(), $id = 0 ) {
		// Code for start_el goes here
	}

	public function end_el( &$output, $item, $depth = 0, $args = array() ) {
		// Code for end_el goes here
	}
}
The 'start_el' is the start element method. Generally this method is used to add the opening HTML tag for a single tree item (such as <li>, <span>, or <a>). Here is the code for the 'start_el' method...
public function start_el( &$output, $item, $depth = 0, $args = array(), $id = 0 ) {
	$indent = ( $depth ) ? str_repeat( "\t", $depth ) : '';

	$classes = empty( $item->classes ) ? array() : (array) $item->classes;

	if (in_array("new-column", $classes)) {
		$output .= '</ul><ul class="sub-menu">';
	}

	$classes[] = 'menu-item-' . $item->ID;

	$class_names = join( ' ', apply_filters( 'nav_menu_css_class', array_filter( $classes ), $item, $args, $depth ) );
	$class_names = $class_names ? ' class="' . esc_attr( $class_names ) . '"' : '';

	$id = apply_filters( 'nav_menu_item_id', 'menu-item-'. $item->ID, $item, $args, $depth );
	$id = $id ? ' id="' . esc_attr( $id ) . '"' : '';

	$output .= $indent . '<li' . $id . $class_names .'>';

	$atts = array();
	$atts['title']  = ! empty( $item->attr_title ) ? $item->attr_title : '';
	$atts['target'] = ! empty( $item->target )     ? $item->target     : '';
	$atts['rel']    = ! empty( $item->xfn )        ? $item->xfn        : '';
	$atts['href']   = ! empty( $item->url )        ? $item->url        : '';

	$atts = apply_filters( 'nav_menu_link_attributes', $atts, $item, $args, $depth );

	$attributes = '';
	foreach ( $atts as $attr => $value ) {
		if ( ! empty( $value ) ) {
			$value = ( 'href' === $attr ) ? esc_url( $value ) : esc_attr( $value );
			$attributes .= ' ' . $attr . '="' . $value . '"';
		}
	}

	$item_output = $args->before;
	$item_output .= '<a'. $attributes .'>';
	$item_output .= $args->link_before .$prepend.apply_filters(  'the_title', $item->title, $item->ID ).$append;
	$item_output .= $description.$args->link_after;
	$item_output .= '</a>';
	$item_output .= $args->after;

	$output .= apply_filters( 'walker_nav_menu_start_el', $item_output, $item, $depth, $args );

	// Check to see if this is a parent list item, if it is open the mega-menu div
	if (in_array("menu-item-has-children", $classes)) {
		$output .= '<div class="mega-menu">';
	}
}
There is quite a bit of code in here. Most of which is copied from the walker class for menus at wp-includes\nav-menu-template. This is an example WordPress offers to help get you off the ground so you don't have to write out all the code yourself.
The crucial parts for us generating our mega menu are lines 6-8 and 45-48. The rest of the code will go about creating the opening html tags for our menu using 'ul' and 'li' elements with any necessary classes, id's, title attributes etc.
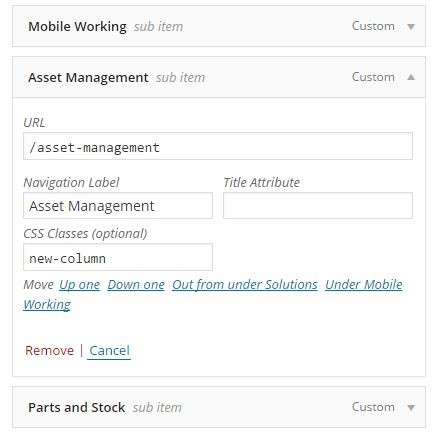
WordPress doesn't offer us a way to specify how columns can be generated in menus, so I created a check to see if a class of 'new-column' has been applied to a menu item in WordPress admin.

The code below checks to see if the menu item has a class of 'new-column'. If it does, it closes the sub menu and opens a new one. Then can then be styled in CSS using float left to give us the columns we need.
if (in_array("new-column", $classes)) {
	$output .= '</ul><ul class="sub-menu">';
}
Next, we want to check if the menu item has a class of 'menu-item-has-children'. This is a class automatically generated by WordPress if the menu item has children. If it does then we open a div with the class of "mega-menu" which we can use for styling our mega menu items. And that is all there is to it for the 'start_el' method.
Next we need to look at the 'end_el' method. Where the 'start_el method created the opening html structure for our menu items, the 'end_el' method is used to create any closing HTML tags for a single tree item (such as </li>, </span>, or</a>).
public function end_el( &$output, $item, $depth = 0, $args = array() ) {

	// if there is a menuwidget with same name as menu item add menuwidget data and close div
	if($widget = get_page_by_title($item->title, OBJECT, "menuwidget"))
	{
		if ( $widget->post_status == "publish")
		{
			// Get information
			$title = CFS()->get('menu_widget_title', $widget->ID);
			$image_id = CFS()->get('menu_widget_thumbnail', $widget->ID);
			$image = wp_get_attachment_image_src( $image_id, 'full' );
			$image_url = $image[0];
			$button = CFS()->get('menu_widget_link', $widget->ID);
			$button_url = $button['url'];
			$button_text = $button['text'];

			// Output information
			$output .= "<div class=\"menu-aside\">\n";
			$output .= $image ? "\n<a href='" . $button_url . "'><img src='" . $image_url . "' alt='" . $title . "'></a><br/>" : "";
			$output .= $title ? "\n<p>" . $title . "</p>" : "";
			$output .= $button ? "\n<a href='" . $button_url . "' class='button-border'>" . $button_text . "</a>" : "";
			$output .= "\n</div><!-- END menu-aside -->\n";
		}
	}

	// Check to see if this is a parent list item, if it is close the mega-menu div
	$classes = empty( $item->classes ) ? array() : (array) $item->classes;
	if (in_array("menu-item-has-children", $classes)) {
		$output .= '</div><!-- END mega-menu -->';
	}

	$output .= "</li>\n";

}
In order to match up a menu widget with the menu item it belongs to, I decided the best way was to match the names. This code will first check to see if there is a menu widget with the same name as the current menu item. If there is, then it will check the menu widget is published, and not saved as a draft or in the bin. As long as the widget is published it will go and gather all the widgets details (title, image, URL, etc) and create the necessary html to display it on the page.
The code then checks to see if the current menu item has the class 'menu-item-has-children'. This is the same check as we had in the 'start_el' method except this time around it closes the mega-menu div, rather than opens it.
Then we simply close off the menu item with a '</li>' tag.
Getting the outputted menu to use your custom walker
The last piece of the puzzle is to make sure that when you output your menu, that you tell your menu it needs to use the walker you created.
<?php
$args = array(
	'theme_location'    => '',
	'menu'              => 'Main',
	'container'         => 'false',
	'container_class'   => '',
	'container_id'      => '',
	'menu_class'        => 'main-menu',
	'menu_id'           => 'main-menu',
	'echo'              => true,
	'fallback_cb'       => 'wp_page_menu',
	'before'            => '',
	'after'             => '',
	'link_before'       => '',
	'link_after'        => '',
	'items_wrap'        => '<ul id="%1$s" class="%2$s">%3$s</ul>',
	'depth'             => 0,
	'walker'            => new my_walker()
	);

wp_nav_menu ($args);
?>
The code above will display the menu in your template. The section highlighted in red is the part that tells the menu to use your custom walker class rather than the default one used by WordPress. Note that you must pass an actual object to use, not a string.
Further reading
For full details on the walker class, see the wordpress codex - https://codex.wordpress.org/
There is also a tutorial on using it at - http://code.tutsplus.com/

